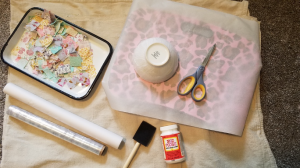
DIY Fabric Bowl
AGE RANGE: PROJECT SHOULD BE EASILY ACCOMPLISHED BY AGES 4 AND UP WITH HELP FROM PARENT OR GUARDIAN
APPROXIMATE TIME: 30 MINUTES TO 1 HOUR
Give purpose to your fabric scraps by making a fabric bowl! A fun way to recycle, this activity encourages scissor skills and has the added benefit of being an excellent sensory activity.
EDUCATIONAL OUTCOME
Recycling old pieces of fabric into a new functional piece teaches children to view materials that may otherwise be trash, in a new way. This project revolves around recycling and keeping the earth a greener place!
Art Materials Needed

- Bowl
- Plastic Wrap
- Fabric scraps cut into squares (Lightweight fabric works best)
- Scissors
- Foam Brush
- Mod-Podge (Homemade Mod-Podge is glue mixed with water)
- Wax-Paper
- Pan, plate (any solid surface)
Project Instructions
- To begin, wrap the bowl of choice with plastic wrap tightly. Excess plastic wrap can get tucked under the bowl. Turn the bowl upside down on a pan or plate covered with wax paper. (wax paper makes it easy to remove the bowl after the glue dries)
- If not already done, Cut fabric into small squares and shapes.
- Start to glue the fabric onto the bowl with mod-podge. Make sure to use LOTS of Mod-podge with the fabric. Apply glue straight to the plastic wrap, and then on top of the fabric piece as well. Overlap the pieces of fabric.
- Continue around the entire bowl until it is all covered. A second or third layer can be applied as well to make the bowl sturdier!
- Allow the bowl to dry for a few hours, then carefully peel the bowl off of the original bowl and take off the plastic wrap if its stuck.
- Trim the extra fabric from the edge of the bowl, then add fabric squares around the top to create a clean edge.